The Amiga Operating system – Kickstart & Workbench
For people not familiar with the Amiga, it may appear confusing when people talk about Kickstart, Workbench and the AmigaOS, what each of those things is, and how they relate to each other. The intention of this page is to help people understand what each of these things is, and how they relate to each other.
When an Amiga is first turned on, the very first thing it does is load in some computer code from Read Only Memory (ROM) and it then follows those instructions.
In the Amiga 1000, this was referred to as the “bootstrap” ROM, and it was an extremely minimal bit of computer code that prompted the user to insert the Kickstart Disk, and then once the system detected that the Kickstart Disk was inserted, it loaded the contents of the Kickstart Disk into the special 256K of WOM (Write Once Memory), changed this memory to be Read Only Memory, and then restarted the machine. Once there was a valid Kickstart in the WOM, the bootstrap ROM detected that, so instead of prompting for the Kickstart Disk, it instead told the Amiga 1000 to follow the instructions in the Kickstart. This was designed in this way because Kickstart was still being heavily revised and improved upon at the time of the launch of the Amiga 1000, and by loading it from Disk in this way it enabled Commodore to distribute new versions of Kickstart quickly and easily, not to mentioned inexpensively, to all owners of the Amiga 1000, without a need to distribute expensive ROM chips and require the owners to open the machine to replace them.
On almost all other machines (asides from early Amiga 3000 machines), instead of a “bootstrap” ROM, the system instead started directly from the Kickstart, which was in a ROM within the machine, so there was no need to load Kickstart from a disk.
Once Kickstart is available to the system, the Amiga starts following the instructions within Kickstart, which is made up of a series of modules which are loaded as required, which prepare the computer for use. There is more information on what Kickstart is on the page “What is Kickstart?“. The majority of the Amigas Operating System is located within Kickstart, but in order to retain flexibility and enable any module to be updated by loading it from disk.
Once Kickstart has finished doing basic checks of the hardware and loading the various modules within it, the system is now ready to load software from disk – that could be a game, a program such as Deluxe Paint III, or it could be the Amiga Workbench. It is also the job of Kickstart to set up the hardware, and to determine what hardware the machine has – in this way an Amiga 2000 can load Workbench from a hard disk drive connected within the machine (if it has one), or an Amiga CDTV or CD32 can load software from a CD-ROM.
So basically, Kickstart is required in order for the Amiga to be useful, and is what enables it to use whatever software you may choose to use. There are different versions, not only because more and more features were added to the Kickstart software, but also because different hardware was used in different Amiga models, and it is Kickstart that enables the use of this hardware by software.
From the ROM Kernel Reference Exec:
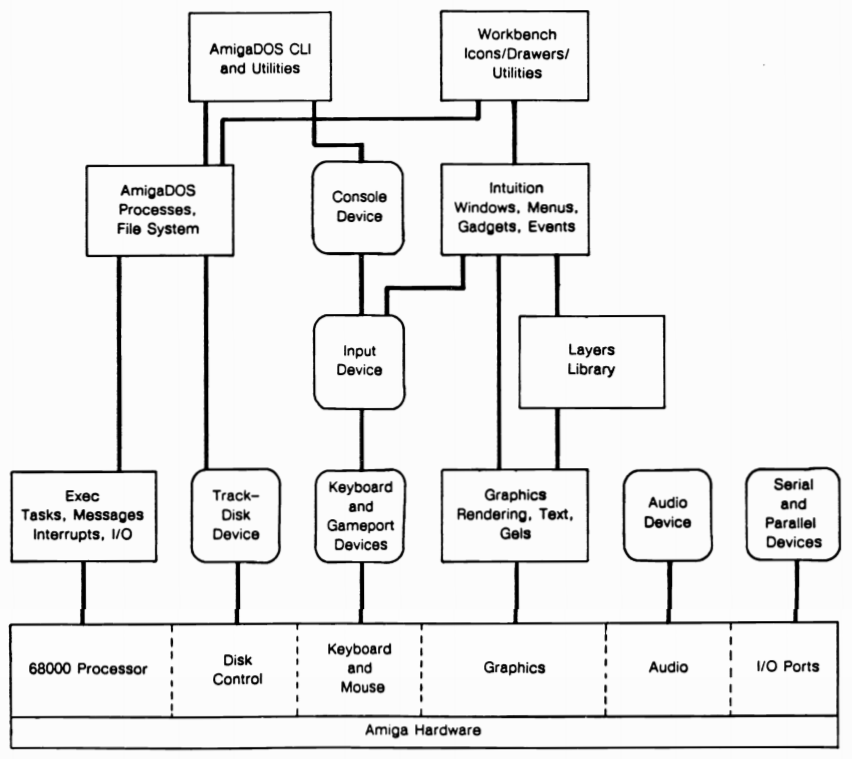
System Software Architecture
The Amiga kernel consists of a number of system modules, some of which reside permanently in the protected kickstart memory and others that are loaded as needed from the system disk. At the top of the hierarchy are Workbench and the Command Line Interface (CLI), the user-visible portions of the system. Workbench uses Intuition to produce its displays and AmigaDOS to interact with the filing system. Intuition, in turn, uses the input device to retrieve its input and the graphics and layers library routines to produce its output.
AmigaDOS controls processes and maintains the filing system and is in turn built on Exec, which manages tasks, task switching, interrupt scheduling, message-passing, I/O, and many other functions.
At the lowest level of the hierarchy is the Amiga hardware itself. Just above the hardware are the modules that control the hardware directly. Exec controls the 68000, scheduling its time among tasks and maintaining its interrupt vectors, among other things. The trackdisk device is the lowest-level interface to the disk hardware, performing disk-head movement and raw disk I/O. The keyboard and gameport devices handle the keyboard and gameport hardware, queuing up input events for the input device to process. The audio device, serial device, and parallel device handle their respective hardware. Finally, the routines in the graphics library handle the interface to the graphics hardware.
Amiga System Software Modules
When designing the first version of the Amigas operating system, there were many choices to be made. One of the more controversial was to use a colour scheme that was, well, either loved or hated. But there was a good reason for it.
The aim was for the Amiga to be usable with a TV if the user didn’t chose to use a dedicated computer monitor. Now, this was in the 80s, long before HDTV, HDMI, or even composite video. Many people still had a black and white TV, in fact you could still purchase them brand new. For many people, the only method of connecting something like a computer or games console (which was the original design brief for the Amiga) was to connect it to the TVs Radio Frequency (RF) input. This is the same way regular TV signals were broadcast at that time. Then they would ‘tune’ the TV in to the frequency the RF modulator for the computer was working at. This meant that the entire picture, as well as all the sound, had to be sent to the TV using the one wire, which usually resulted in less-than perfect picture and sound quality.
So, how do you make text readable on a TV that may be quite small and have a far-from-perfect picture quality? You can make the text bigger – which was often done with earlier machines, such as the Commodore Vic 20 and Commodore 64, or you can increase the contrast of the colours being used. The engineers went out and purchased the ‘worst’ brand new TV they could find, and then used that to experiment with colour schemes, icons and text sizes. Although black and white had the greatest contrast, on the Television sets of the time, using black and white on a high resolution screen (a 640 pixel width screen was considered high resolution at the time) would often result in unreadable text, because of various technical factors.
After much experimentation, it was found that a blue background, with white used as the main contrasting colour, along with orange and black, gave the best results on even a terrible TV. This colour scheme would be used right up until the big redesign of Kickstart 2, by which time TVs had improved considerably.
So that, my friends, is why the main colours you see on Amigas up until about 1990 was Blue, White, Orange and Black.