Paula

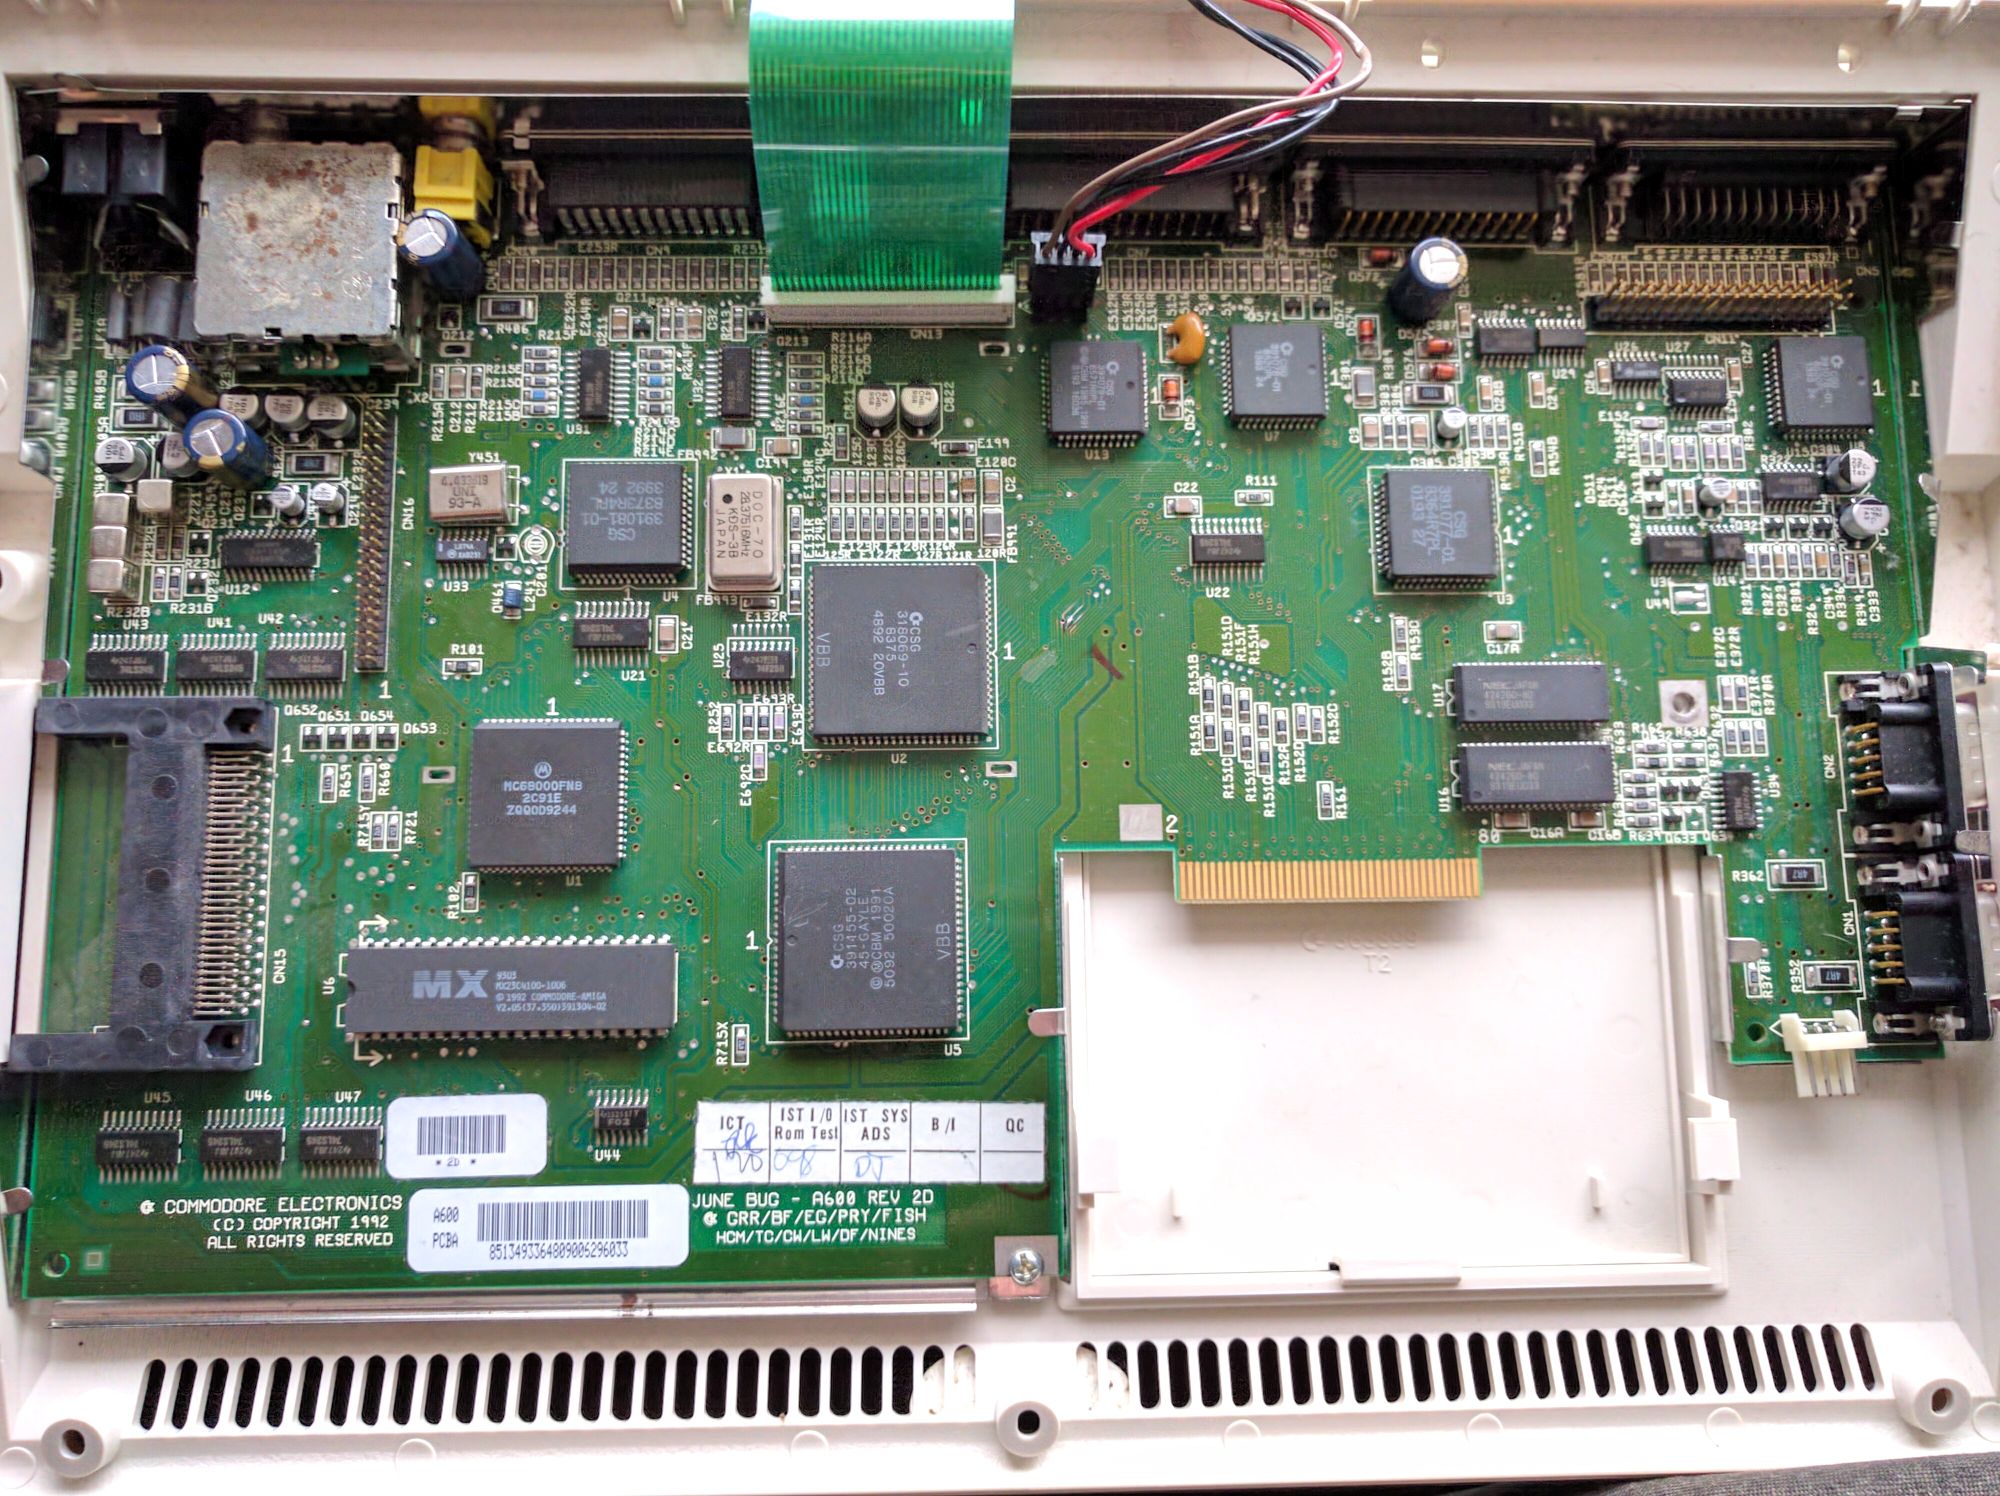
The Paula chip includes logic for audio playback, floppy disk drive control, serial port input/output and mouse/joystick buttons. The logic remained functionally identical across all Amiga models from Commodore.

It was designed by Glenn Keller.

Paula is a contrived contraction of Ports, Audio, UART and Logic, and coincidentally the chip designer’s girlfriend.

What made Paula revolutionary was that it was capable of playing back sampled sound from memory without needing the Central Processing Unit to do the bulk of the work.

A comparison here may help, comparing the way the sound output on the Apple Macintosh computers of the time produced sound, and the way the Amiga computers produced sound using the Paula chip.

On the Macintosh, to play a sound, the CPU needs to load the next bit of sample data into the sound register over 22,000 times a second, interrupting whatever else it may be doing at the time.  The CPU can only do one thing at a time, so this effectively slows the CPU quite a lot.

On the Amiga, using the Paula chip, The CPU tells Paula where in Chip RAM the sample is stored, how long to play it for, and what rate to play it at.  Then Paula is able to play the sound in it’s entirety without any intervention from the CPU, unless for some reason the sound needs to be stopped early.

We’ll use an analogy here to give an idea of the difference.  Say you’re trying to bake a cake, and want to listen to some music at the same time.  In this analogy, you are the CPU, and operate at about the same speed in both the Amiga and the Apple Macintosh (not true in real life, but close enough), the CD is the sound you wish you hear, which has been loaded into RAM, and the CD player is the sound generator – so either the sound output circuitry in the Apple Macintosh, or the Paula chip in the Amiga.  So, you pop a CD in the CD player and press play.  Now, if this was the Amiga, the CD can play from start to finish without you needing to be interrupted while baking the cake.  If this was the Macintosh, you have to stop whatever you’re doing every second while baking the cake to go to the CD player and press play again.  I’m sure you can see how much longer it will take you to bake the cake and how much less efficient this process would be?

This was revolutionary at the time, and is why Amiga computers always performed better than other computers of the time, despite having the same Central Processing Unit as many others running the show, so to speak.

DraCo – the Amiga ‘clone’

When Commodore went bankrupt in 1994, the Amiga was still a viable option for video editing and titling.  Rather than wait for the mess to be sorted out with regards to the ownership and production of the high end Amiga models suitable for such tasks (Amiga 2000/3000/3000T/4000/4000T), a company already known for producing Amiga expansion products for high-end Amiga systems, MacroSystem Computer GmbH, designed and produced the DraCo.  This system was was later called the DraCo Vision, it was an Amiga-like system, compatible with some hardware and software and intended for  non-linear video editing.

What makes this system interesting is that the Draco did not contain any of the Amigas custom chips.  This meant it could not run any Amiga software or hardware that depended on the Amigas unique hardware.  But it did start using an Amiga 3000 kickstart, which was patched during boot with the SetPatch command to re-route most of the requests to work with graphics and sound to the appropriate hardware that was a part of the Draco system.

For video output, it used a modified version of the Retina BLT Z3, called the Altais, which is connected via one of the proprietary DraCo Bus slots.  For audio, it uses the Toccata Zorro II card.  There was also a V-Lab Motion Zorro II card, and for storage it had a SCSI II controller and came with a SCSI Hard disk drive  and a CD-ROM drive.

For expansion, there are a total of 3 DraCo Bus slots and 5 Zorro II slots.  There were only ever 2 cards produced to work with the DraCo Bus slots: the Altais and Draco Motion cards.  The 5 Zorro II slots are clocked at a higher bus speed than any other Amiga, and thus not all Zorro II cards work properly, but for those that do, they can process data faster than in other systems.

So, was this an Amiga system?  That really depends on your definition of an Amiga.  If your definition of an Amiga is that it must contain at least one of the Amigas custom chips, such as Paula (found in all “Amiga” machines) than no, it wouldn’t be.  But if your definition of an Amiga is any system that can use some hardware and software for an Amiga computer, than yes, it would be.  Very very few game software titles designed for Amiga computers will work on a Draco, as most do not use the software routines in Kickstart, instead working directly with the Amiga custom chips.

Here at the Amiga Museum, we have decided to include the Draco Amiga ‘clone’ system in our online museum, as it’s a historically significant system that shows there was considered to be enough market demand for a high-end Amiga to produce such a thing – which in itself shows how successful the Amiga had become by 1994 in the professional non-linear video editing market.

CPU: Motorola 68040 @ 25MHz
Motorola 68060 @ 50MHz
Motorola 68060 @ 66MHz
Chip RAM: None.  Reports video memory on the graphics card as Chip, but this is NOT Chip RAM
Maximum resolution: 1600×992 in 16-bit colour (65,536 different colours on screen at once)
Kickstart versions: 3.1
Workbench version: 3.1
Total RAM: 128MB
Price in 1994:
(US Dollars)
$14,990

More information is available on this page: https://amitopia.com/draco-the-unknown-68k-amiga-clone/

Ron Nicholson

Ron Nicholson was one of the original designers of the Amigas AgnusDenise and Paula chips.

Glenn Keller

Glenn Keller was the designer of the Paula chip, used in every Amiga.

USA Patents granted to “Glenn Keller”, including many of the original patents for the Amiga.

Chip and Fast RAM

What is Chip RAM?

Chip RAM is RAM that can be accessed by the Amiga Agnus or Alice chip, as well as by the Central Processing Unit.  It is where the sound samples that are played by Paula are stored, it is where the data that makes up the display is stored.  The contents of Chip RAM can be read and written by both the CPU and the custom chips (via DMA access with the Agnus or Alice chip), however while it’s being accessed by one, it can’t be accessed by the other, the custom chips have priority over the CPU.  This means that if there is only Chip RAM in a system, there will be times when the CPU has to wait to access it, slowing down the systems CPU.

What is Fast RAM?

Fast RAM does not have the limitation mentioned above, but it can’t be accessed by Agnus or Alice, it can only be addressed by the CPU.  Thus, simply adding Fast RAM to any Amiga that only has Chip RAM can potentially speed up the machine.

The AGA Chipset…

The AGA Chipset.

The final revision to the Amigas custom chips came to be known as the AGA chipset.  It was originally going to be called the AA chipset, but it was changed to AGA, which apparently stood for “Advanced Graphics Architecture”, which sounds about right, because while the graphic output had quite a number of changes, the audio system was untouched.

In the previous OCS and ECS chipsets, the colour palette was always formed using 4bits for each of the Red, Blue and Green elements, giving a total of 4096 colours (16*16*16=4096) to choose from, of which 32 could be shown onscreen at once without using the EHB or HAM6 video modes.  HAM could show all possible colours, with restrictions, and EHB could display 64 colours, but both had heavy restrictions, and are covered in more detail on the pages for OCS and ECS.

In AGA, this was doubled to 8 bits for each RGB element, giving a total of a 16.8 million colour palette (256*256*256=16,777,216 colours) while retaining near total compatibility with older software.  This increased the maximum onscreen colours without using tricks to 256 colours, and added a new HAM mode, HAM8, which can technically show virtually all of the over 16 million colours available in the palette, but due to the restriction in how HAM8 mode operates, using a base palette of 64 colours and then modifying the Red, Green or Blue of the pixel to the right, realistically you can’t use all the available colours in a useful way.  However, it is still capable of showing some absolutely stunning pictures that are visually very close to a modern true colour picture.

The bus width for the Chip RAM access to and from the custom Chips was doubled, from 16-bit to 32-bit, to allow more to be completed on each bus cycle.  The bus clock speed was also doubled.  This meant that operations done by the custom chips were up to 4 times the speed when compared to the previous generations, which is a considerable improvement.

It also allowed output in higher resolutions for the higher colour modes, so you could have a 640×400 screen showing 256 colours, or even showing HAM8 and it’s 262,144 possible colours.

To show the differences, here are some examples, showing the same picture, on the left we have HAM6 (4096 colours) and EHB (64 colours), on the right we have HAM8 (262144 colours) and 256 colours.  It must be noted that while they may all appear to be in the same resolution, the limitations in OCS and ECS mean that the horizontal resolution is half that of the AGA examples:

OCS/ECS Chipset AGA Chipset

HAM 4096 colours

HAM, Low resolution non-interlaced, 4096 possible colours from a palette of 4096

HAM 8, Hiresolution interlaced, 262,144 colours from a possible 16.8 million.

HAM 8, High resolution interlaced, 262,144 possible colours from a palette of 16.8 million.

EHB 64 colours from a possible 4096

EHB, Low resolution non-interlaced, 64 possible colours from a palette of 4096

256 colour, High resolution interlaced, 256 possible colours from a palette of 16.8 million.

Original picture.

For comparison, the original picture.

However, not everything was improved.  Paula was the same, still working on a 16-bit bus, still locked to the display timings output by the Display processor, which was now Lisa, but still outputting 4 channels of 8-bit audio.  Hence AGA is only an upgrade to the Amigas chipset in terms of the graphical output.

Amiga AGA Graphics Supplement.  P/N 371198-01

The OCS Chipset…

The Original Chipset

The original Amiga chipset was used in the original Amiga 1000, the Amiga 2000-A and Amiga 2000-B, the Amiga 500 and the CDTV.  In 1990, the Amiga 3000 featured the ECS chipset, which was an update of the Agnus and Denise chips, and some of the chips in the Amiga 2000-B and Amiga 500 were updated with some of the ECS chips.  In 1992, Agnus and Denise were were replaced by Alice and Lisa in the AGA Chipset.  The Paula chip, which was one of the original chips in the original chipset, remained functionally similar in all versions of the Amiga machines.

What was revolutionary about the Amiga chipset was that each chip worked independently of each other and of the central processor and could be programmed.  Thus sound could be played, the display could be changed, and the central processor was still free to do whatever work necessary.  This means that the central processor didn’t need to be as fast as in competing systems, where the central processor had to do the work that the Amigas custom chips did.

Paula was the name given to the Audio chip, which also handled the floppy disk drives and the serial port.  Paula was essentially unchanged for the entire lifespan of the Amiga, and was found inside every single model Amiga.  More information on Paula can be found here: The Paula Chip.

Denise was the main video output chip in the OCS Chipset.  Denise read in the data from Chip RAM for the display and used that to determine what would be shown on the screen. Very early Amiga 1000s had a different Denise chip to later Amiga 1000s and all later Amigas that was not able to display the Extra HalfBright 64 colour mode, which worked on all later revisions.  More information on Denise can be found here: The Denise Chip.

Agnus was the heart of the Amiga chipset, and was in charge of interfacing the other custom chips with the “Chip RAM“, amongst many other tasks.  More information on Agnus can be found here: The Agnus Chip.

A picture in the HAM (Hold And Modify) mode, capable of showing all 4096 colours at once on screen.  This could be shown on an Amiga 1000 from 1985!


Amiga 1200

Amiga 1200 with 2 external drives

Amiga 1200 with 2 external drives

The home computer takes several steps forward…

While the Amiga 500 plus and the Amiga 600 were largely considered to not be worth upgrading from an Amiga 500 for, the Amiga 1200 was most certainly worth considering upgrading to.  Some of the changes that had been introduced with the Amiga 600 were carried over to the new Amiga 1200, such as the PCMCIA slot and the IDE hard disk drive interface.  But the main thing that got people interested was the inclusion of the AGA chipset from the Amiga 4000.  The CPU speed was twice as fast as the Amiga 500, 2MB of chip RAM was standard, and the AGA chipset increased the colour palette from the 4096 colours of the previous OCS and ECS machines to a full 16.8 million colours.  The maximum number of colours that could be displayed also increased, using HAM8, to 262,144 colours, which may not sound that great now, but in reality, still looks quite nice indeed.  Kickstart was now up to version 3.0, and Workbench 3.0 came with the machine too, bringing further enhancements to the package.

But it wasn’t all good news.  Despite almost every other existing computing platform moving to high density drives, the Amiga 1200 still had the same old double density drive as the Amiga 1000, meaning it could not read the high density disks that were rapidly becoming so common.

Also, the sound hardware was unchanged since the previous generation, still using the Paula chip to output 4 8-bit channels of sound – 2 on the left, 2 on the right.  While this had been advanced stuff in 1985, by 1992 8-bit sound output was common, and 16-bit sound output was starting to show up on competing platforms such as the Macintosh and IBM PC Compatibles.

CPU: Motorola 68ec020 @ 14.32 MHz (NTSC)
Motorola 68ec020 @ 14.18 MHz (PAL)
Chip RAM: 2048K
Maximum resolution : 1448×482 (NTSC)
1448×556 (PAL)
Other resolutions, including 800×600,640×512, 640×480 and others, dependant on display device*
256 colour maximum in all display resolutions without using the Amigas special graphics modes
Kickstart versions: 3,0
3.1
Workbench version: 3.0
3.1
Total RAM: 2048K
Price in 1992:
(US Dollars)

Documentation:
Workbech 3.0 User’s Guide
Amiga 1200 System Schematics
The Complete Amiga 1200 User Guide

In the UK and Australia the Amiga 1200 was available in a bundle known as the ‘Desktop Dynamite’ Pack which contained Workbench 3.0, Deluxe Paint IV AGA, Wordworth and two games: Oscar and Dennis. There was also a Comic relief version that came bundled with the game Sleepwalker. This also came with Workbench 3.0.

<- Back to Amiga 600 On to CD32 ->

Amiga 600

Amiga 600

Amiga 600

The Amiga 600 was announced in 1991 as a replacement for the Amiga 500 Plus and became available to purchase on the 18th of March, 1992, but was widely considered at the time to not be a worthwhile purchase over an Amiga 500 or 500 Plus.

a600-mainboard

Inside a revision 2D Amiga 600

As the revision 2D Amiga 600 above only has one of it’s custom chips (Gayle) clearly marked with it’s name, here are the chip numbers for the other 3:

  1. 8375 chip is the Super Agnus chip.
  2. 391077-01 is the Paula chip.
  3. 391081-01 is the Super Denise chip.

The original plan for the Amiga 600 was to call it the Amiga 300, and sell it as the most inexpensive model in the range.  This is the main reason it’s so small and lacks the numeric keypad as found on every other Amiga models keyboard.  The main board has most of the chips soldered on, rather than socketed, in a move to reduce costs while also increasing reliability.

Apparently people within Commodores marketing department decided that features had to be added to the machine to make it a marketable item, and so the 44-pin IDE hard disk interface and PCMCIA slot were added, adding to the costs and pushing the cost to the consumer to above the cost of the machine it was intended to replace, while not offering enough for most to consider it a compelling upgrade – particularly in light of the reduced expandability that was a direct result of the intention for the machine to be the most inexpensive Amiga.  While the Amiga 500 and 500 plus offered both RAM expansion and a general-purpose expansion, the Amiga 600 only offered a RAM expansion option and a PCMCIA slot.

Despite this, the Amiga 600 has gained some popularity in recent years, as it’s compact size and in-built Hard disk interface, along with the PCMCIA expansion, make it fairly easy to transfer data to it from modern machines without needing to purchase much, and the availability of expansions that provide a faster CPU, more FAST RAM, an interface for modern displays, and even the Vampire II 600, which transforms the smallest Amiga ever into one much faster than even an Amiga with a 68060.

CPU: Motorola 68000 @ 7.16MHz (NTSC)
Motorola 68000 @ 7.09MHz (PAL)
Chip RAM: Standard 1024K
Expandable to 2048K
Maximum resolution: 1448×482 (NTSC)
1448×556 (PAL)
4 colour maximum in screenmodes above 724 pixels wide*
Kickstart versions: 2.0
Workbench version: 2.05
2.1
Total RAM: 1024K Expandable to 10MB (2048K Chip, 8MB Fast)
Price in 1991:
(US Dollars)

Documentation:
Amiga Release 2 Getting Started
Using the System Software V2.05
A600 System Schematics

<- Back to Amiga 4000 On to Amiga 1200 ->

Up to and including 1984

To tell the story of the Amiga, we really need to include two of the projects that were worked on by many of the same people that preceeded it – The Atari VCS/2600 and the Atari 800.  Many of the same ideas from each of these were greatly expanded upon for the next, and without these, it is doubtful that the Amiga would have existed at all.

The Amiga is basically an evolution of the ideas in the Atari 800.  The Atari 800 (and later versions of the Atari 8-bit computer and game console line based upon it) used a combination of ANTIC and GTIA chips to provide graphics, and the POKEY chip to handle sound and serial input/output.  Change ANTIC to AGNUS, change GTIA to DENISE and change POKEY to PAULA and you have what breaks down to the same basic system, although with massive improvements.

In 1982 Jay Miner quit working at Atari, and with David Morse (who left Tonka Toys, where he was Vice-President of Marketing), founded Hi Toro Inc., which later that year became Amiga Inc.  This was the beginning of the Amiga.

David Needle (1947 – February 20, 2016, Rest In Peace) was a key engineer and co-chief architect in the creation of the Amiga 1000 computer. He was one of the main designers and developers of the custom chips of the Amiga computer.

Carl Sassenrath joined Amiga Computer Inc. in 1983, where he became Manager of Operating Systems at the small company, and designed the Exec section of Kickstart.

In 1984, Robert J. Mical joined Amiga Inc, and designed the Intuition part of the Amiga Kickstart, which handles user input, windows, menus and the gadgets for user interaction.

October 1984: Commodore acquires Amiga Computer Inc. for up to 550,000 shares of capital stock and  cash of $12.8 million.  *Source: Commodore 1985 Annual report to shareholders.

About October or November 1984: after Commodore had acquired Amiga Computer Inc., there was a big rush to get the machine finished and a product available for the public to purchase.  At this point, some referred to the Operating System for the Amiga as CAOS (Commodore Amiga Operating System), which is apt, as in many ways it was CAOS in trying to get everything ready.

Amiga Lorraine prototype

On to 1985 to 1986 ->